Spiderman: Across the spiderverse, is one of the most visually impressive animated movies I’ve seen.
For this piece I wanted to recreate the Spot transformation scene in Unreal Engine 5, to try to push the boundaries of what I can techincally and visually achieve. Everything was renderer and composed in Unreal.
The Spot
I modelled the character in Blender, based on references found online and in the official artbook. The model is quite basic, with my main objective being that the shapes and overall sillhouette read similar enough to the character to be recognizable. The character was swiftly rigged in Mixamo. I was originally planning on including some other animations, but ended up just having a very simple animation that I also made in Blender.
Once I had the model to play around, I could begin having fun.
Spot’s Body shader
For the body, I wanted the following features:
- Hand painted feel, with different styles of strokes
- Chaotic and unstable feel, with movement of textures and colors.
- Low framerate feel, movement should be applied at fixed (and varied) framerates
- All of the above properties should be easy for me to art direct.
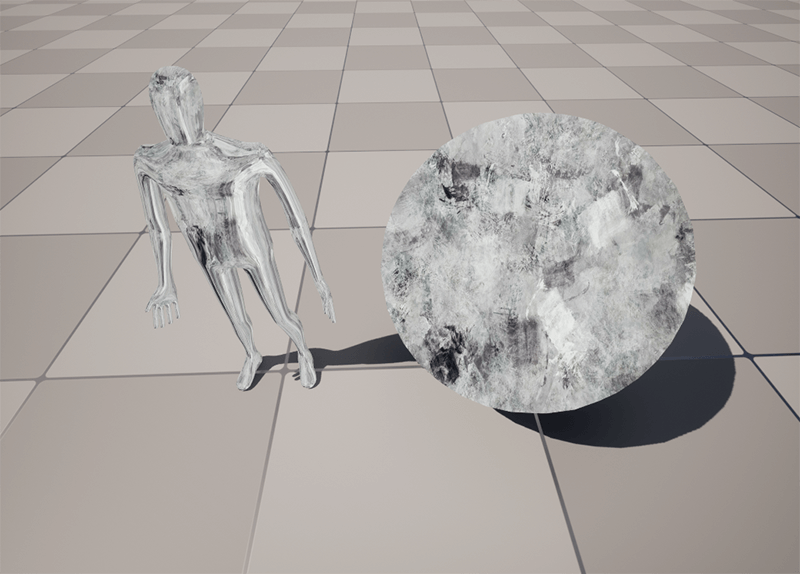
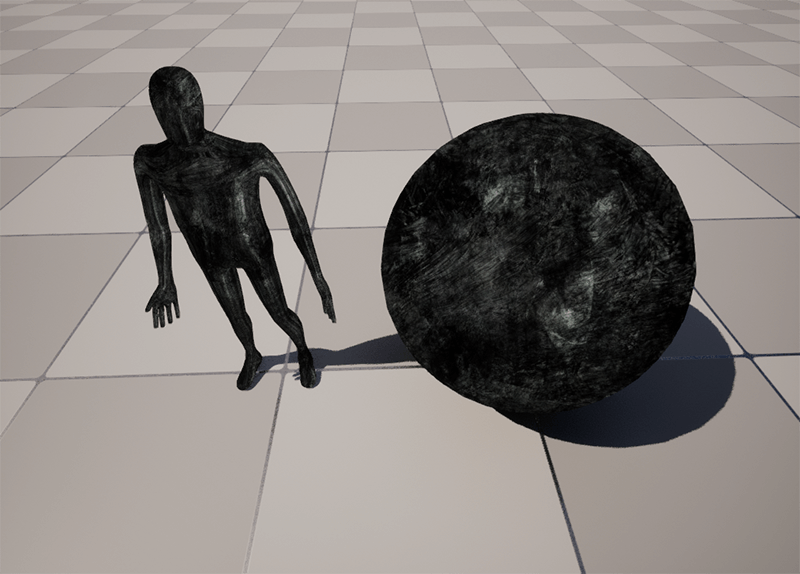
Below is the final look of the main body shader:
Since this was the first visual I tackled, many of the findings and tricks I used to achieve this where latter reused pretty much everywhere else.
Brush Strokes
To achieve the unstable, hand painted look I wanted, I decided to project some brush textures over the model, which ended working quite well.
There are two textures using a MatCap style projection, based on this great tutorial by Ben Cloward, as well as a simple UV mapped texture.
Here’s what a single MatCap projected texture looks like:
That doesn’t look too interesting… But when multiplied with another matcap and a UV projected texture, it looks like this:
The UV projected texture helps break it up a bit more, and ensures that it doesn’t look too weird when the angle to the camera changes.
This base already has a very gritty, slightly unhinged feel to it that I really liked.
Texture animation
In the movie, spot has some incredible texture animations, which really help give Spot an unstable feel. In order to achieve a similar effect, my approach was to pan the textures in opposing directions, and update each individual texture at a different framerate, using Temporal Posterization.
Having the textures panning at different time intervals and with different directions give the material a more organic look, as if each layer had a mind of its own.
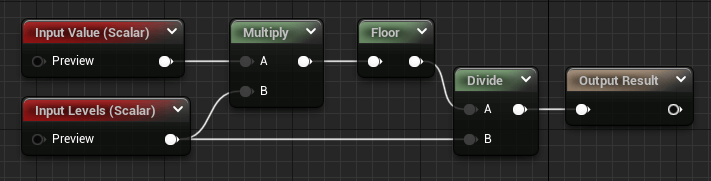
Temporal Posterization
Posterization is often used to give a stylized look to images, but it’s also incredible useful to modulate time into discrete time intervals (IE: get time at a certain framerate)
My posterize material function looks like this:
And it’s used like so:
In the above example, the X coordinate of the texture is panned, at 3 frames per second, and each step moves the texture 0.33% to the left. The output of the posterize can be modulated so that framerate and texture panning amount are not correlated 1:1.
Vertex collapse
I wanted to emulate the very dynamic way Spot dissapears in the movie. To do so, I implemented a Vertex Collapse shader based on similar techniques as described here and here
Essentially we rotate the vertices around an offset point, and at the same time we move all the vertices towards that point.
This is what the rotation part of the shader looks like in isolation:
We pan a value through the X axis, which is used both as the pivot, as well as a mask for the rotation. The rotation axis, as well as the size and contrast of the mask can be adjusted and animated.
When combined with collapsing (all vertices are moved to a singular point), the effect looks quite interesting, and highly stylized:
Since this effect is only visible for a couple of frames, having highly dynamic shapes and extreme deformation is quite desirable.
Lastly, during those frames, some extra meshes are added, serving the same purpose smear frames do in traditional animation.
Post Processing tricks
Sobel Filter
In order to draw lines around the contours of Spot, I use a Sobel Edge detection postprocess, based on the one described in this amazing tutorial This filter is a screen-space post processing, which means we can apply all 2D techniques that we know and love, such as warping the UVs of the image, which will produce wobbly lines. Below an example of the Sobel filter, with exaggerated values for demonstration purposes:
There’s 2 Sobel filters, with offsets and distortion values that can be controlled through a Material Parameter Collection, so that they can easily be keyframed on a Sequence.
There’s also a color control, which allows me to flip the edge color between black and white for a flashing effect.
Lastly the effect will only be applied to meshes that have a custom stencil of a certain value specified, so that only intended geometry will be highlited (this is to avoid certain “invisible” meshes on the background being highlighted)
Dynamic flowmaps
Somethign I wanted to try was to have a dynamic flowmap to distort the background. Flowmaps are widely used to paint directionality in liquids or to improve the look of explosion or smoke spritesheets.
I wanted my flowmaps to be dynamic and controlled by particle systems, so I could quickly test different brush styles, movement and patterns.
I setup a system in which there’s particles writing their motion data to a texture buffer, and then read that texture in the PostProcess, which allows me to have much more complex behaviour of the distortion easily.
And the live flowmap looks like this:
I’m directly feeding the Velocity information of each particle into the Particle Color with Niagara. These particles get rendered only in a Scene Capture2D component, whose output renders into a RenderTarget.
By accumulating this velocity over time, we get a dynamic flowmap that is being painted by these textures. I set the composite mode of the Render Target to Composite, so that each new frame is blended with the previous one, rather than immediately overwriting it.
In that same SceneCapture2D I render a plane with [0.5,0.5,0] color (this represents ’no distortion’ in the flowmap). The material for this plane is transparent, with a very low opacity, which means that the plane will, over time, slowly ’erase’ the previosly drawn particles.
The last piece of the puzzle was to mask out Spot himself, as I wanted the distortion to only happen in the background. A simple Custom Stencil mask did the trick.
And that’s all I have for you today.
Thanks for reading my breakdown, I Hope you liked it.
Matias